
One common piece of advice to newer knitters is to carefully read the pattern, beginning to end, before you cast on a single stitch. It would be wonderful if you did this to familiarize yourself with it and to anticipate possible trouble areas, but I have the feeling that most of you will blow that off. Okay, I'll face reality. But please, please, don't blow off looking at the little line drawing of whatever you're making. A good schematic will show all major parts of the garment (for a sweater, for example, you'd want to see a sleeve, and the body), along with measurements.
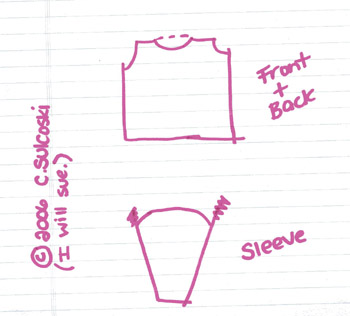
Here's an example of one from Rowan's book A Season's Tale:
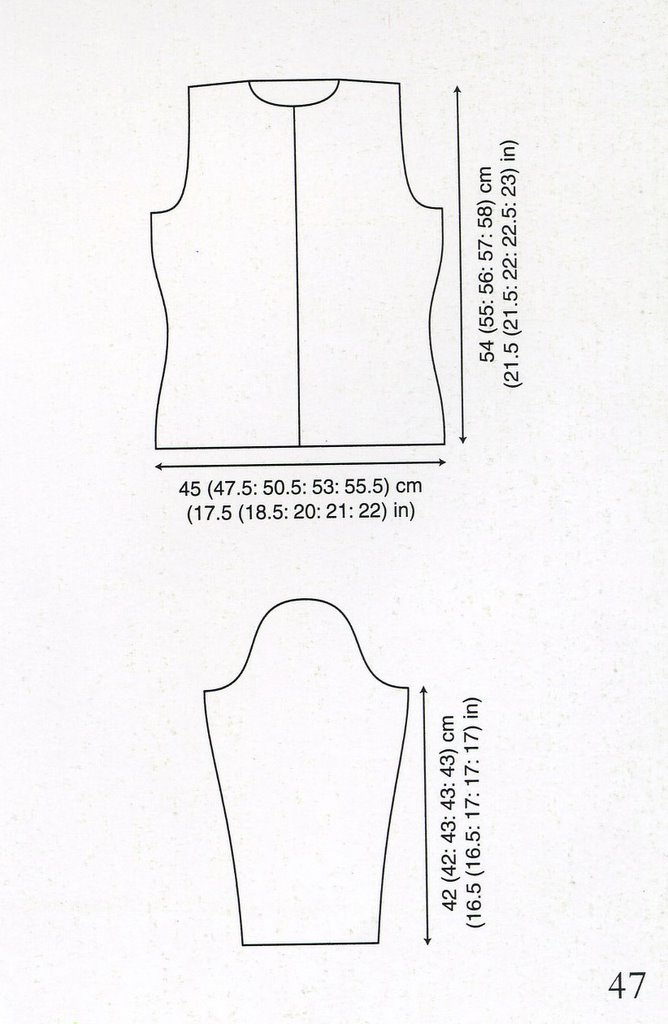
This drawing includes a sleeve (both are the same so you need only one drawing, right?) -- shown on the bottom -- and the front and back combined (the front and back are going to be mirror images, so they are usually combined into one drawing, with the front and back necklines shown. Unless you're a hunchback, in which case you ought to proceed to the seminar on Intermediate Short-Row Shaping... but that's another post for another day.) This is a cardigan, and they've indicated the divide between the left and the right fronts by the vertical line going down the middle.
You may have heard me complain in my book reviews about pattern books that don't contain schematics. It would indeed be nice if every pattern in the world came with one (unless it's a rectangle, like a scarf). Sadly, not all do. Don't worry; I'll talk about this later. Just stay with me for now.
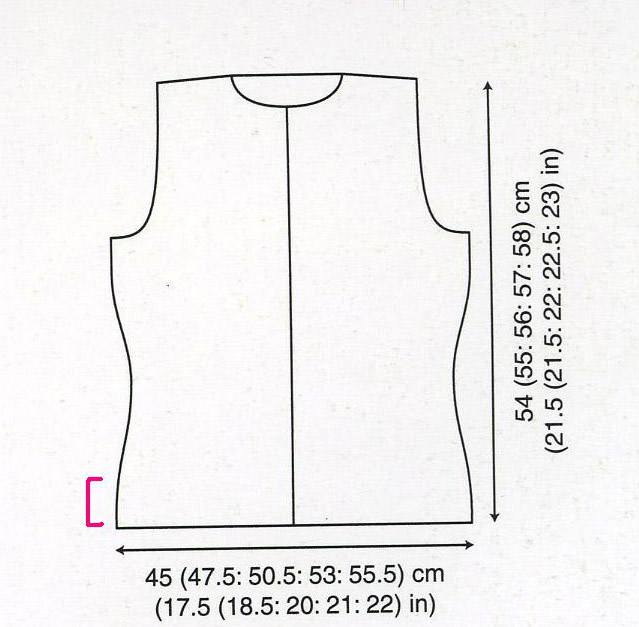
Next I want you to take a good, common-sense look at the drawing. Let's start with the body of the sweater (you know, the front & back). How are you going to knit this sucker? From the bottom up to the top? From the top down to the bottom? From one side to another (not common, but it could happen)? Take your finger and put it on the place where you'll start. Trace your finger back and forth, the way you'll go when you're knitting. Follow your finger as it proceeds, applying your common sense to what has to happen to make your knitting match the drawing.

I've shown in red the way you will start at the bottom right-hand corner of the front (assuming you're knitting from bottom up to top) and how you will knit across one row, right to left, and then purl back, left to right.
There are really only a handful of options when it comes to what happens next. You can continue working the same number of stitches, and your garment will stay the same width. You can add stitches (increase), and it'll get wider. You can take away stitches (decrease), and it'll get smaller. Watch how this applies to my Rowan example.
You start out by going back and forth for a while without adding or taking away stitches.
Now we see the body curve in; this is shaping for the waist, i.e., the sweater starts to nip in to follow the natural line of your waist as it nips in (at least in theory; I'm taking the Fifth when it comes to my waist). The body of the sweater gets narrower, so you're going to make some decreases. Your waist nips in about equally on both sides, so you'll make equal decreases on both sides.
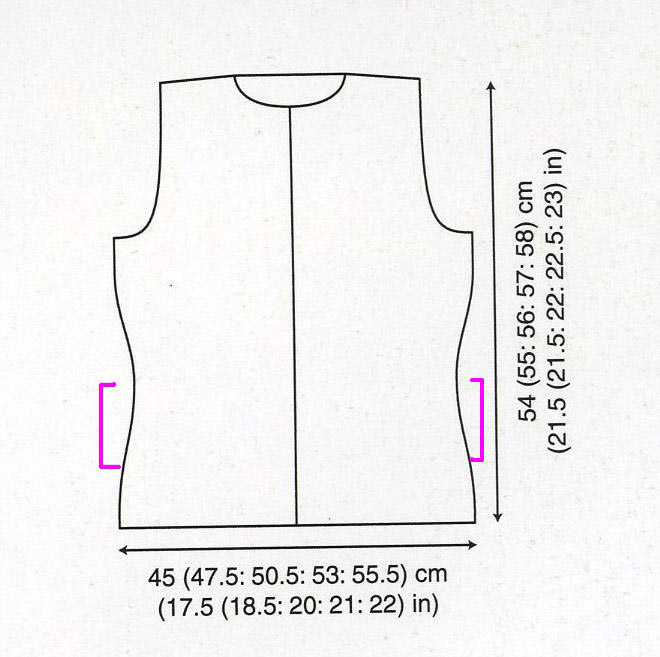
You hit the narrowest point, and the sweater starts to curve out again. So you make some increases to make the sweater wider. Again, your waist is symmetrical, so you'll make equal increases on both sides.

You continue without increasing or decreasing for a while, and then you hit the pit.
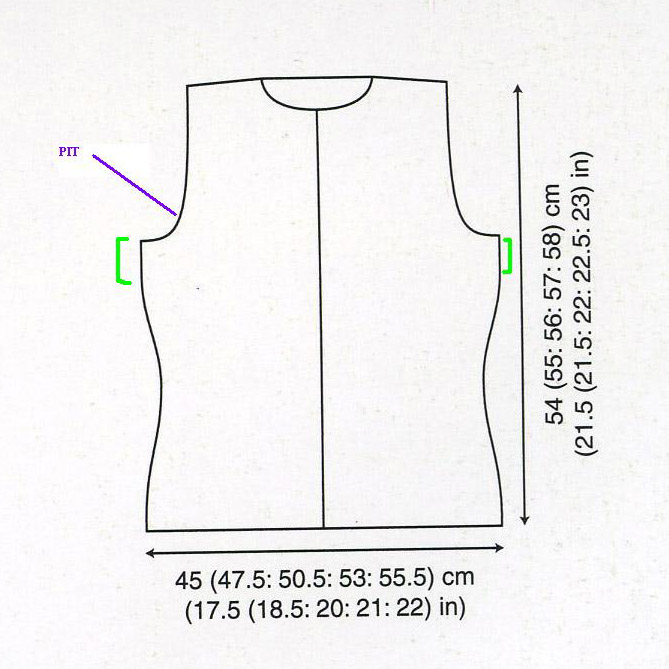
The armpit, or rather, the armhole shaping. You can see how the body of the sweater swoops in, making a curve that the sleeve will fit into. And follow your finger: you'll have to do it on both sides, because you have two arms. Keep applying your common sense (I know you have it, I just know you do) and you'll notice how the armhole make a sudden cut in, where you decrease a bunch of stitches at once -- in the same row -- for the flat part of the armhole (red),
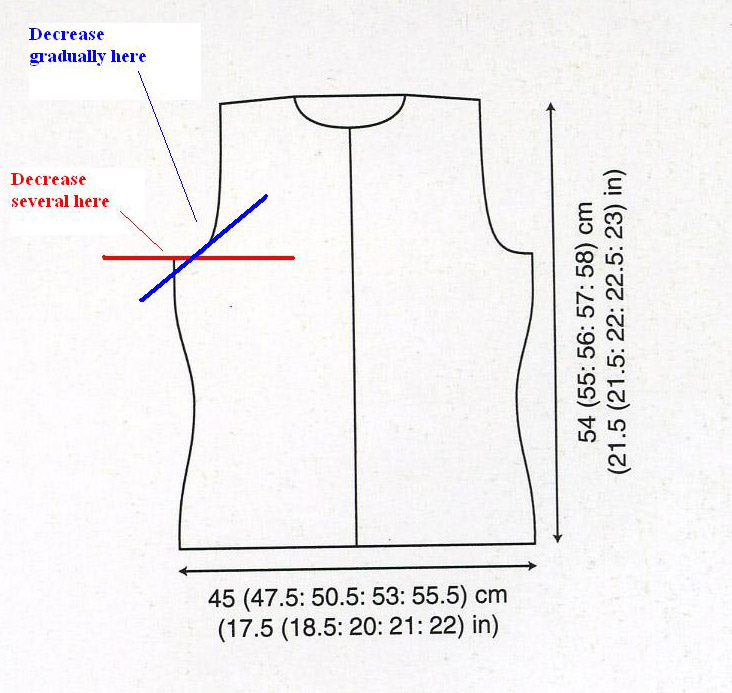
and then a more gradual slope, where you decrease one stitch per row for the upward slant (blue). Think about the way an armhole on a tank top looks and you can visualize this.
At some point, you'll have to do neck shaping. You can see on this drawing how there's a semicircle at the top, the hole that your heads goes through. To make this, you'll have to get rid of stitches. If you trace your finger back and forth, you may be able to see how you'll get rid of several stitches in the middle, all at once, to make the wide bottom part of the neck
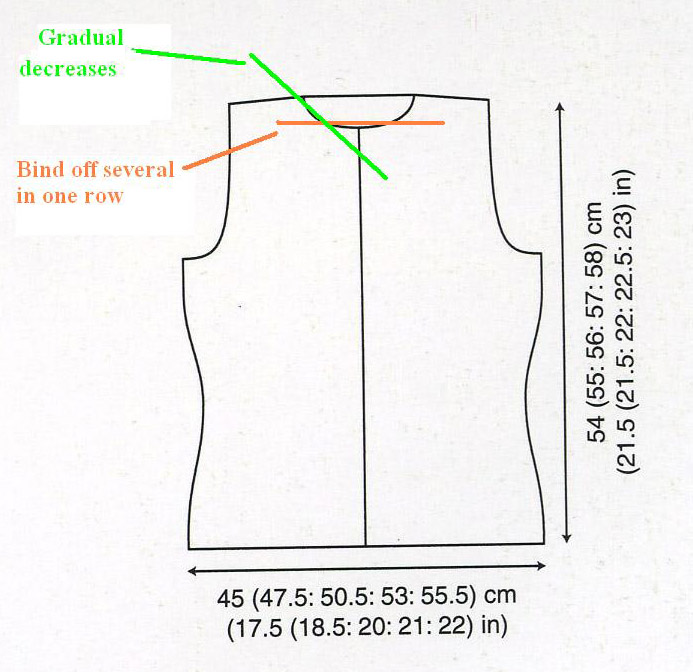
then gradually decrease on each side, maybe one or two stitches at a time, to get the more gradual curve of the neck.
Similarly, you can take a look at the sleeve. You'll probably start at the wrist, the narrowest part, and work your way up. See how the sleeve gradually gets wider as you go up? Increases, symmetrically on the sides.
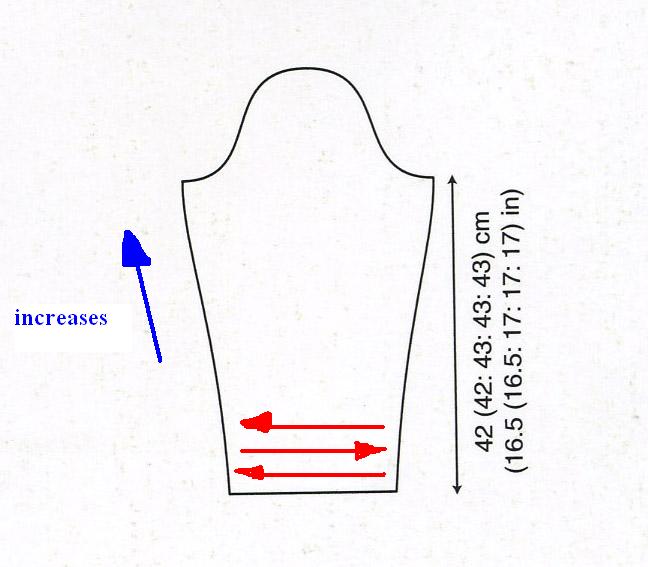
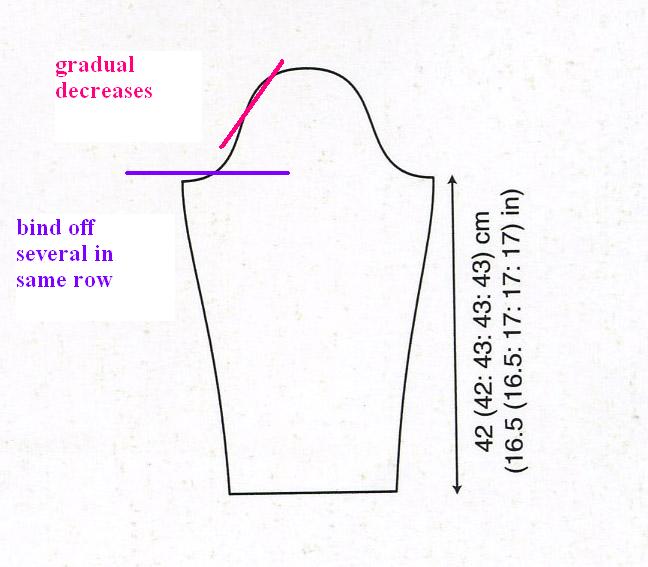
Then you can see how the sleeve dips into for the armhole, just as the body of the sweater did. They need to be mirror images of each other so you can sew them to each other. You can follow the line of the sleeve as it then decreases more gradually up to the top.
Once you begin the actual knitting, remember your little tour of the schematic. You can figure out where you are in the knitting by tracing along with your finger, and you can even anticipate the kinds of things that need to happen next. You'll be knitting along for a while, and then the pattern will tell you to decrease. "Yes," you'll mutter to yourself, "this is where the body of the sweater nips in to create waist shaping!" When the pattern tells you to increase, you'll say, "Ah, now we are adding stitches as we finish the waist shaping!" When the pattern tells you to bind off 10 stitches at the beginning of the next two rows, you'll know that first you are going to get rid of 10 stitches on one side for one armhole, and then on the next row, you are going to rid of another ten stitches on the other side for the other armhole. The pattern will make more sense to you (I hope) and you may even be able to interpret what the designer means if the pattern text itself isn't entirely clear.
If by chance your pattern does not include a drawing, don't despair. I am going to suggest something wild and radical: make your own. Get a piece of blank paper (an extra sheet of printer paper will do just fine) and a pencil. You ought to have some sense of what the garment looks like or you wouldn't have chosen to make it, right? There almost certainly is a photograph of a finished version of the item, right? You can read the pattern and figure out what they want you to do, right? (If you have no idea what you're making or what it looks like, well, then you really have no business making it, do you?)
Let me hear no whining about how you can't draw or you're a lousy artist. Ptui. [Edited for Michelene.] No one but you is going to look at this, so shut up and draw. If you were making a simple crewneck sweater, your drawing might look like this:
(See? I can't draw like Franklin either.) You can read through the pattern to see if there's waist shaping, what kind of armhole shaping you need, what kind of neckline is involved. And by the time you're done with the sketch, you'll have a pretty clear idea of where you're going with this sweater.


21 comments:
Carol, you misspelled Pttoey. I know because it was in my official script of Santa Claus: The Musical as Ptui! Plus it's on the back of my big green shirt that way too, so your spelling must be incorrect.
You may wonder, why does a play about Santa Claus have spitting(of course it also has some odd bits about pleasing children with bits of wood, but I digress)? Don't ask.
I think I probably don't want to know about the spitting (although I can imagine that the kid who spits gets put on the "Naughty" list, or is that wishful thinking?) but I fixed it just for you.
And here I thought I would be getting a kvell over how you now see knitting in a whole new way, thanks to my in-depth schematic discussion. (martyred sigh)
It saddens me to point out that you two are arguing about how to spell ptooey (hmph, see, you're both wrong) at eight o'frickinclock on a Monday.
carol, i love your 'i will sue' copyright notice. if i use it, will you sue me, too?
maybe i'll start a company, 'litigious and acrimonious designs'...
judy
Oh Kath, Michelene & I have been SAYING ptooey since six a. frickin' m., seeing as how we have young kids 'n all.
Judy, I think a certain Scottish designer already has cornered the market on that one, but I could be wrong.
Didn't ANYONE find my schematic discussion helpful?
Thank you Carol! It is a very nice schematic discussion. I've walked newbies through things like this before (the subject was tatting not knitting). People who think differently than me (ie: those who are the artistic, jump in, no thought to the 14 steps necessary in preparation kind, where I'm a computer person surrounded by logical, hands on, engineering types) are the ones I find most often stuck in the pattern because they didn't check/create a schematic.
Betty in Minnesota
I was just thinking about schematics earlier while looking through Vintage Knits at the library. There are some nice sweaters in there but they are all artfully posed in the photos and have NO schematics. Means one has to do an awful lot of work to decide whether it will be a good shape before knitting (though there is also the matter of not coming in XL and thus much biggering must also occur is any of these things strike my fancy).
Since alcohol is rather calorie-laden, too many Fifths of anything would definitely impact one's waistline.
Oh, Caro, brilliant and to the point as pithy as always.
I already know this stuff, so there.
Very nice schematic primer, Carol. Something all knitters should know, in my opinion. I don't get why some folks find this scary. Bleu cheese, now that's scary.
Carol,
Very helpful information for the newbie knitters (like me) who enjoy your blog everyday. Thank you for the great tutorial.
Ann
You explain things really well. Schematics are also really useful to scribble notes on and do calculations when re-sizing patterns. Although I've taught myself a fair bit throught trial and error (memo to all big ladies - your shoulders do not widen in proportion to your hips when you gain weight), can I put in a request for a lesson in how to re-size (especially up-size) patterns?
Private rant: I once saw someone teaching a knitting class and advising her students not to read ahead in the pattern--"it'll just confuse you" was her basic point. Made me nuts, but there wasn't much I could do about it at the time.
On the other hand, how do you tell a newbie to read all the way through, but not be intimidated by anything they don't understand?!
I've only recently started paying attention to schematics (probably because I'm finally learning to sew) and you're absolutely right -- they really do help. I'm inspired to try drawing a schematic for the rompers I'm knitting since the shaping doesn't make sense to me. I've been proceeding on blind faith, but maybe it'll all make sense now.
Okay, I'm curious. Have you ever taught a class? It seems like you would be delightful at it. Methodical, thorough, and fun.
Great tutorial. I very much enjoy your blog. Very informative and funny too. Thanks especially for turning me on to the Rowan Yarn Classics.
Jove, if you get the schematics on the male model in Vintage Knits, do email me. (that's drool, not spit).
Actually, the spitting really didn't have anything to do with Claus, just the bad vs. good Immortals. Really a weird story, but on a dare I auditioned and performed with my daughters. Hahaha, so do you think I was a good Immortal, or a Bad Immortal?
Your schematics lesson was quite helpful to me Carol. Lopi(of which I have an ungodly amount) doesn't like to use them any more than Debbie Bliss.
Bravo on the tutorial Carol. You might expand on this showing how one alters a sweater pattern and the calculations neccessary to do so. In particular, the armhole and sleeve crown measurements. Anyone who is of a petite or fuller figure will appreciate this information I am sure.
Also, I must weigh in on the new Rowan #39. I think it's fucking amazing. And I think Kathy Merrick is fucking amazing too!!! Thankfully she "gets it". I like people like Kathy because they see this publication for what it is. They understand the distinction between RYC and Rowan. Also, this age bullshit and comments about being over 40 has nothing to do with it. Why limit yourself? As Kathy said" What's wrong with a little adventure, a little license, a little odd? " Amen.
Yeehoo, Patrick, thanks for the kind words!
Can I send you flowers or something to cement our relationship?
What a great article... one that I wish you had written when I first started knitting (yeah, it's all your fault I got so confused!). Do you mind if I put a link to it on my blog?
Jay, I would be honored. Great fair isle swatch, by the way.
And if any of you others have requests for blog topics, let me know. (The mom in me loves to make y'all happy.)
Post a Comment